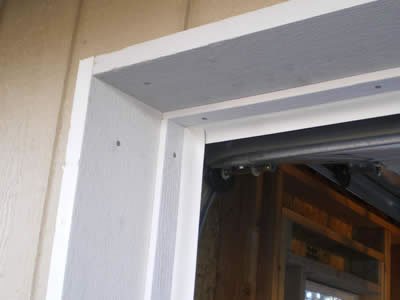
“Adding proper garage door seals to your garage will help you
enjoy a warmer, cleaner garage”
Installing garage door weather stripping (also known as astragal) fills the gap around the edge of your garage door. This flexible weather seal limits air flow into the garage, resulting in a more comfortable environment when your garage door is closed, and helping keep dust and debris outside the garage.
Installing garage weather stripping is a fairly straight forward process. You just need to follow a few simple steps. Read on to learn where to find it and how to install it.
Finding Garage Door Weather Stripping
Most hardware and home improvement stores carry a variety of garage door seals, including thresholds, bottom seals and garage door weather stripping or weather stripping kits. The most common weather stripping is a hard plastic or aluminum nailing strip with a soft, flexible vinyl or rubber piece attached to it.
The flexibility of the softer piece allows the garage door to move up and down while the weather stripping maintains positive contact with the door. If you can’t find what you need at the local hardward store, contact a garage door repair and installation company in your area.
Garage Door Weather Stripping Installation Instructions
Here are the installation steps:
- If you are replacing old garage weather stripping, you must first remove it with a flat bar (a type of pry bar) and a hammer. Carefully tap the flat bar under the existing nailing strip and pry it away from the door frame, being careful not to damage the frame.PRO TIP: Put a small piece of wood or a flat piece of metal (like a heavy duty putty knife) under the flat bar where it is prying against the wood. This will protect the door frame from damage as you pry against it to remove the weather stripping. If the nails are being stubborn, you can try using a “cat’s paw” (a small nail removing tool with a curved end) to first remove the nails instead of trying to remove everything at once.
- With the old weather stripping removed, the new pieces can be installed. Here are the steps:
- Begin by closing the garage door. You will be working on the outside of the garage door, so you will want to have the weather stripping and your tools outside the garage.
- Starting with the top or “header” piece, use a fine toothed hand saw or a hack saw to cut square ends on the header piece so it will fit snugly across the top of the garage door. A fine toothed power saw (preferably a chop saw or miter saw) will make nice cuts if you have that type of saw.
- Nail the header piece in place so the flexible weather strip lies up against the garage door and “floats” as the garage opens and closes.If the weather stripping you purchase does not have pre-marked nailing positions, you will need to make a judgment call on how far apart to install the nails. Depending on the flexibility of the nailing strip, your nails will likely need to be placed from eight to eighteen inches on center.
- Be sure the nailing strip fits snugly against the door frame. Some garage door weather stripping comes with nails for installation. If yours does not, you can use roofing nails or wide head box nails.
- SAFETY NOTE: Be sure to use proper safety protection when working with power tools. Always wear safety glasses or goggles and hearing protection when using power saws and other power tools.
- Measure and cut the side pieces so they touch the header piece and extend to the garage floor. Hold each of the side pieces in place and nail them in the same fashion as you nailed the header piece.
- Trim the soft weather stripping at the top of the side pieces at about a 45 degree angle so the top and side pieces overlap nicely.
- Test the garage door to be sure it opens and closes smoothly. In a few days, take another look at the door to be sure it is not catching during the opening and closing process. Make adjustments if necessary.
Garage Door Weather Stripping: An Easy Fix with Big Benefits
Adding proper garage door seals to your garage will help you enjoy a warmer, cleaner garage in the winter and a cooler garage in the summer, especially if you already have insulated garage doors. For more information on creating a climate controlled garage environment, visit our pages on garage door seals and insulated garage doors.

Garage Door Weather Stripping Is Easy To Install
Related Links
Other Garage Door Seals
Benefits of Insulated Garage Doors
Return from Garage Door Weather Stripping back to Garage Door Seals
